S1DX Timers (Discontinued Products)
Download
-
Discontinued Products
-
Rating/ Performance
-
Dimensions
-
Wiring/ Connection
-
Cautions For Use
Ⅾiscontinued
Last time buy
October 31, 2022
We are sorry, the products have been discontinued. Please refer to the details of the discontinued products and the recommended substitutes list below.
Discontinued Products

Rating/ Performance
| Type | AC operating type | DC operating type | |
|---|---|---|---|
| Rated operating voltage | 24V, 100 to 120V, 200 to 220V, 220V to 240V | 12V, 24V | |
| Operating voltage range | 80 to 110% of rated operating voltage | ||
| Rated frequency | 50/60Hz common | - | |
| Power supply ripple | - | Full-wave rectified (Approx. 48%) | |
| Rated power consumption | Max. 3VA | Max. 2W | |
| Rated control capacity (resistive) | [Timed -out 2 Form C]: 7A 250V AC [Timed -out 4 Form C]: 5A 250V AC | ||
| UL/CSA rating | [Timed -out 2 Form C]: 7A 125 AC, 6A 250V AC, 1/6HP 125, 250V AC, PILOT DUTY C300 [Timed -out 4 Form C]: 5A 250V AC, 1/10HP 125, 250V AC, PILOT DUTY C300 | ||
| Output arrangement | Timed-out 2 Form C, Timed-out 4 Form C | ||
| Initial contact resistance, max. (By voltage drop 6V DC 1A) | 100mohm | ||
| Expected life (min. operations) | Mechanical | 107 | |
| Electrical (resistive) | 2×10⁵ | ||
| Initial insulation resistance (At 500V DC) | Min. 100Mohm Between live and dead metal parts/input and output Between contact sets Between contacts | ||
| Initial breakdown voltage | 1500Vrms for 1min Between live and dead metal parts/input and output 1500Vrms for 1min Between contact sets 1000Vrms for 1min Between contacts | ||
| Shock resistance | Functional | Min. 98m/s2(4 times on 3 axes) | |
| Destructive | Min. 980m/s2(5 times on 3 axes) | ||
| Vibration resistance | Functional | 10 to 55Hz: 1 cycle/min double amplitude of 0.5mm (10min on 3 axes) | |
| Destructive | 10 to 55Hz: 1 cycle/min double amplitude of 0.75mm (1h on 3 axes) | ||
| Max. temperature rise | 70°C/ 158 ° F | ||
| Ambient temperature | -10 to 50°C/ +14 to 122 ° F | ||
| Ambient humidity | Max. 85% RH | ||
*Power one-shot type of 1 s type: +(2% + 10 ms)
Following products will be discontinued in the end of September, 2020.
【Plug-in Terminal】
- Power On-delay DC operating type(Rated operating voltage:12V DC, 48V DC, 100 to 110V DC)
【PC Board Terminal】
- Power On-delay (Rated operating voltage:100 to 120V AC, 200 to 220V AC, 24V DC )
Cautions For Use
Timers Cautions for Use (Common for All Models)
Cautions for circuits
1.Protective circuit for timer contact
In the circuit that switches an inductive load, a contact failure may occur at a contact point due to surge or inrush current resulting from that switching.
Therefore, it is recommended that the following protective circuit be used to protect the contact point.
| Circuit | Application | Features/Others | Device Selection | |||
|---|---|---|---|---|---|---|
| AC | DC | |||||
| CR circuit (r: resistor c: capacitor) |  | * Note: | Available | If the load is a relay or solenoid, the release time lengthens.Effective when connected to both contacts if the power supply voltage is 24 or 48 V and the voltage across the load is 100 to 200 V. | If the load is a timer, leakage current flows through the CR circuit causing faulty operation. Note: If used with AC voltage, be sure the impedance of the load is sufficiently smaller than that of the CR circuit. | As a guide in selecting r and c, c: 0.5 to 1 µF per 1 A contact current r: 0.5 to 1 ohm; per 1 V contact voltage Values vary depending on the properties of the load and variations in timer characteristics. Capacitor c acts to suppress the discharge the moment the contacts open. Resistor r acts to limit the current when the power is turned on the next time. Test to confirm. Use a capacitor with a breakdown voltage of 200 to 300 V. Use AC type capacitors (non-polarized) for AC circuits. |
| - | ||||||
 | Available | Available | ||||
| Diode circuit |  | N/A | Available | The diode connected in parallel causes the energy stored in the coil to flow to the coil in the form of current and dissipates it as joule heat at the resistance component of the inductive load. This circuit further delays the release time compared to the CR circuit.(2 to 5 times the release time listed in the catalog) | Use a diode with a reverse breakdown voltage at least 10 times the circuit voltage and a forward current at least as large as the load current. In electronic circuits where the circuit voltages reverse breakdown voltage of about 2 to 3 times the power supply voltage. | |
| Varistor circuit |  | Available | Available | Using the rated voltage characteristics of the varistor, this circuit prevents excessively high voltages from being applied across the contacts. This circuit also slightly delays the release time. Effective when connected to both contacts if the power supply voltage is 24 or 48 V and the voltage across the load is 100 to 200 V. | - | |
2.Type of Load and Inrush Current
The type of load and its inrush current characteristics, together with the switching frequency are important factors which cause contact welding. Particularly for loads with inrush currents, measure the steady state current and inrush current and use a relay or magnet switch which provides an ample margin of safety. The table below shows the relationship between typical loads and their inrush currents.
| Type of load | Inrush current |
|---|---|
| Resistive load | Steady state current |
| Solenoid load | 10 to 20 times the steady state current |
| Motor load | 5 to 10 times the steady state current |
| Incandescent lamp load | 10 to 15 times the steady state current |
| Mercury lamp load | 1 to 3 times the steady state current |
| Sodium vapor lamp load | 1 to 3 times the steady state current |
| Capacitive load | 20 to 40 times the steady state current |
| Transformer load | 5 to 15 times the steady state current |
When you want large load and long life of the timer, do not control the load direct with a timer. When the timer is designed to use a relay or a magnet switch, you can acquire the longer life of the timer.
3.Connection of input
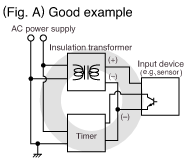
Since PM4H and LT4H series timers use a transformerless power supply system, the input equipments must have the power supply transformer in which the secondary side is not grounded with the primary and secondary sides insulated, in order to prevent interference of the power supply circuit when connecting the external input circuit as Fig. A.
Be sure not to use an autotransformer. In case of secondary side grounded or using the autotransformer, this product may be destroyed due to short circuit electrically as Fig. B (1 and 2).
In case of F.G. terminal of equipments such a PLC grounded in secondary side of the transformer, inner circuits of this product and the input equipment may be destroyed due to short circuit electrically as Fig.B (3).
Therefore, use the isolated type timers or do not ground F.G. terminal of the products.

4.Long Continuous Current Flow
Long continuous current flow through the timer (approx. one month or longer) cause generation of heat internally, which degrade the electronic parts. Use the timer in combination with a relay and avoid long continuous current flow through the timer.
When using contact output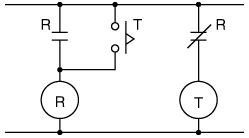
5.Leakage current
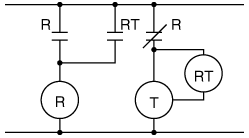
- 1.For connecting and disconnecting operating voltage to the timer, a circuit should be used, which will prevent the flow of leakage current. For example, a circuit for contact protection as shown in Fig A. will permit leakage current flow through R and C, causing erroneous operation of the timer. Instead, the circuit shown in Fig. B should be used.

- 2.If the timer is directly switched with a non-contact element, leak current may flow into the timer and cause it to malfunction.
6.Power off time
If the operation voltage for the timer is turned ON after the limit time operation is completed or before the limit time is reached, the Power off time longer than the timer restoration time must be secured.
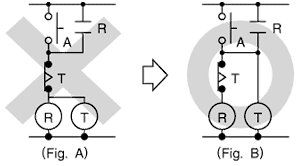
7.Suicide circuit
If the timer is restored immediately after the specified time is reached, the circuit must be configured so that the restoration time of the timer can be secured sufficiently.
If the power circuit for the timer is turned OFF with the timer contact, a suicide circuit may be configured (Fig. A). In order to settle the problem with this potential suicide circuit, the circuit must be designed so that the timer is turned OFF after the self-retention circuit is completely released (Fig. B).
8.Electrical life
The electrical life varies depending on the load type, the switching phase, and the ambient atmosphere. In particular, the following cases require careful attention:
- 1.If an AC load is switched in synchronized phases:Locking or welding is liable to occur due to contact transposition. Check this with the actual system.
- 2.If a load is switched very frequently:
If a load which generates arcs when a contact is switched is turned ON and OFF very frequently, nitrogen and oxygen in air are combined due to arc energy and then HNO3 is produced. This may corrode metallic materials.
The effective countermeasures include:
- 1.Using an arc-extinguishing circuit;
- 2.Decreasing the switching frequency; and
- 3.Decreasing the humidity in the ambient atmosphere.
9.Pin connections
Correctly connect the pins while seeing the pin layout/connection diagram. In particular, the DC type, which has polarities, does not operate with the polarities connected reverse. Any incorrect connection can cause abnormal heating or ignition.
10.Connection to operation power supply
- 1.Supply voltage must be applied at a time through a switch, a relay, and other parts. If the voltage is applied gradually, the specified time may be reached regardless of its value or the power supply may not be reset.
- 2.The operation voltage for the DC type must be at the specified ripple percentage or less. The average voltage must fall within the allowable operation voltage range.
| Rectification type | Ripple percentage |
|---|---|
| Single-phase, full-wave | Approx. 48% |
| Three-phase, full-wave | Approx. 4% |
| Three-phase, half-wave | Approx. 17% |
- 3.Make sure that no induced voltage and residual voltage are applied between the power pins on the timer after the power switch is turned OFF.
11.Control output
- 1.The load for the control output must be used within the load capacity specified in the rated control capacity. If it is used exceeding the rated value, the life is greatly shortened.
- 2.The following connection might result in short circuit between the heteropolar contacts in the timer.
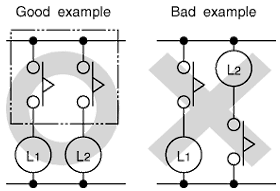
12.Installing the timer
- 1.To install the timer, use the dedicated pin bracket or socket (cap). Avoid connecting the pins on the timer by directly soldering them.
- 2.In order to maintain the characteristics, do not remove the timer cover (case).
13.Superimposed surge of power supply
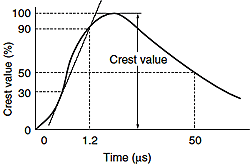
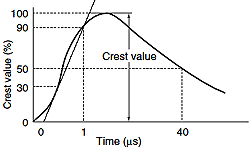
For the superimposed surge of power supply, the standard waveform (±1.2×50μs or ±1×40μs) is taken as the standard value for surge-proof voltage.
(The positive and negative voltages are applied each three or five times between the power pins.) For the standard values for the PM4H, LT4H, and S1DX type timers, see the respective items in "Caution on usage."
PMH [±(1×40)μs]
| Voltage type | Surge voltage |
|---|---|
| AC type (except 24V AC) | 4,000V |
| 12V, 24V DC, 24V AC | 500V |
Other timers [±(1×40)μs]
| Type | Surge voltage |
|---|---|
| PNS CN-C CHP, CHP-F | 20 times rated voltage |
| CHP-SD | 4,000V |
If external surge occurs exceeding the specified value, the internal circuit may break down. In this case, use a surge absorption element. The typical surge absorption elements include a varistor, a capacitor, and a diode. If a surge absorption element is used, use an oscilloscope to see whether or not the foreign surge exceeding the specified value appears.
14.Changing the set time
Do not change the set time when the limit time operation is in progress.
However, this is possible only with the motor-driven type timer if the set time is shorter than the remaining time. For changing the set time on the digital timer (LT4H), see the relevant item in "Caution on use."
15.Operating environment
- 1.Use the timer within the ambient temperature range from -10°C to +50°C/ +14°F to +122°F (+55°C/ +131°F for the LT4H series) and at ambient humidity of 85% RH maximum.
- 2.Avoid using the timer in a location where (a) inflammable or corrosive gas is generated, (b) the timer is exposed to much dust and other foreign matter; (c) water or oil is splashed on the timer; or (d) vibrations or shocks are given to the timer.
- 3.The timer cover (case), the knobs, and the dials are made of polycarbonated resin. Therefore, prevent the timer from being exposed to organic solvents such as methyl alcohol, benzine, and thinner, strong acid substances such as caustic soda, and ammonia and avoid using the timer in atmosphere containing any of those substances.
- 4.If the timer is used where noises are emitted frequently, separate the input signal elements (such as a sensor), the wiring for the input signal line, and the timer as far as possible from the noise source and the high power line containing noises.
16.Checking the actual load
In order to increase the reliability in the actual use, check the quality of the timer in the actual usage.
17.Others
- 1. If the timer is used exceeding the ratings (operation voltage and control capacity), the contact life, or any other specified limit, abnormal heat, smoke, or ignition may occur.
- 2. If any malfunction of the timer is likely to affect human life and properties, give allowance to the rated values and performance values. In addition, take appropriate safety measures such as a duplex circuit from the viewpoint of product liabilities.
S1DX Timer Cautions For Use
1.Terminal wiring
Make sure that terminals are wired carefully and correctly, referring to the terminal layout and wiring diagrams.
2.Assembly
A dedicated terminal base or socket should be used for attachment.
To assure that characteristics are maintained, do not remove the case.
3.Rest periods
After unscheduled operations have been completed, or if the timer operation power supply has been turned off at any time during operation, a rest period of at least 0.1 seconds should be allowed before resuming operation.
4.External surge protection
External surge protection may be required if the following values are exceeded. Otherwise, the internal circuit will be damaged.
| Operation voltage | 100 to 120V AC | 200 to 220V AC | 12V DC 24V DC | 48V DC | 100 to 110V DC |
|---|---|---|---|---|---|
| Surge voltage | 4,000V | 4,000V | 1,000V | 4,000V | 4,000V |

The typical surge absorption elements include a varistor, a capacitor, and a diode.If a surge absorption element is used, use an oscilloscope to see whether or not the foreign surge exceeding the specified value appears.
5.Phase synchronization using AC load
If the turning on of the timer output relay is synchronized to the AC power supply phase,
there may be times when the service life is shortened because of electrical factors,
or when a locking phenomenon(defective relay return) occurs because of contact point welding or a shift in the contact relay. Check the operation using the actual timer.
6.Soldering and cleaning
- 1.A flux-tight construction is not used with this timer, so be careful that flux does not get inside the case.
- 2.Terminals should be soldered by hand(at a soldering iron temperature of 300°C 572°F, for less than 3 seconds, using a
30 to 60 W soldering iron). Automatic soldering should be avoided. - 3.Cleaning should be avoided as much as possible. If the timer has to be cleaned, make sure no cleaning fluid gets inside the main unit case.
7.Installing the unit
- 1.The wire spring included in the product packaging is for the HC relay terminal block.
- 2The wire spring is not usable with an HJ relay terminal block, so the stopper plate spring B (ADX18012: HJ relay terminal
block plate spring) (sold separately) for the S1DH should be purchased.
8.Others
1.When connecting the operating power supply, make sure that no leakage current enters the timer. For example, when performing contact protection, if set up like that of fig. A, leaking current will pass through C and R, enter the unit, and cause incorrect operation. The fig. B shows the correct setup.

When a contact switch having an operation indicating lamp (lamp equipped limit switch, etc.) is used to apply power to the timer, a resistor having a value equal to or greater than the value below shall be connected in series with the lamp.
100 to 120V AC operating type:Min. 33kΩ 200 to 220V AC operating type:Min. 82kΩ

2.When setting the time, the dial should be kept within the range indicated on the dial face.
The “0” marking on the dial indicatesf the minimum time during which the control time can be varied
(it does not indicate 0 seconds).
9.Acquisition of CE marking
Please abide by the conditions below when using in applications that comply with EN61812-1.
- 1.Overvoltage category II,pollution level 2 (2 Form C type)
- 2.The load connected to the output contact should have basic insulation.This timer is protected with basic insulation and can be double-insulated to meet EN/IEC requirements by using basic insulation on the load.
- 3.Please use a power supply that is protected by an overcurrent protection device which complies with the EN/IEC standard (example: 250 V 1 A fuse, etc.).
- 4.You must use a terminal socket or socket for the installation.Do not touch the terminals or other parts of the timer when it is powered.When installing or un-installing, make sure that no voltage is being applied to any of the terminals.
- 5.Do not use this timer as a safety circuit.For example when using a timer in a heater circuit, etc.,provide a protection circuit on the machine side.


