Discontinued Products
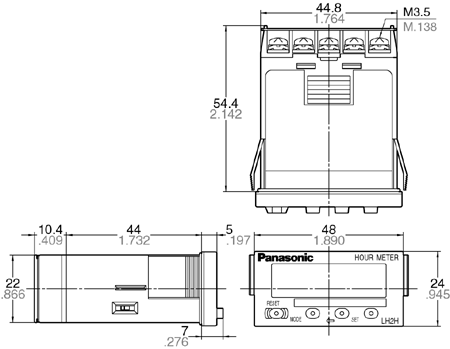
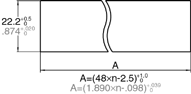
Dimensions
- Unit: mm in
External dimensions
General tolerance : ±1.0 ±0.39
Panel cut out dimensions
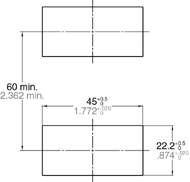
The standard panel cut out is shown below.Use the mounting frame (ATH3803) and the rubber gasket (ATH3804).(Only installation frame type)
For connected installation
(sealed installation)
(Only installation frame type)
Notes: 1. Suitable installation panel thickness is 1 to 4.5 mm/ 0.39 to 0.177 inch. 2. Waterproofing will be lost when installing repeatedly (sealed installation).
When installing the one-touch installation type model, make sure that the installation spring does not pinch the rubber gasket.
To prevent the installation spring from pinching the rubber gasket:
1.Set the rubber gasket on both ends of the installation spring(left and right).
2.Confirm that the installation spring is not pinching the rubber gasket, and then insert and fix the installation spring in place from the rear of the timer unit.
Cautions For Use
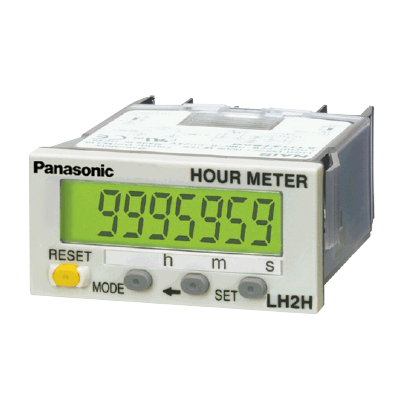
LH2H Preset Hour Meters Cautions for Use
Input and output connection
Input connection
1.Input connection
Contact input
Use highly reliable metal plated contacts.
Since the contact’s bounce time leads directly to error in the timer operating time, use contacts with as short a bounce time as possible.
Non-contact input (Transistor input)
Connect with an open collector.
Use transistors whose characteristics satisfy the criteria given below.
VCEO = Min. 20 V
IC = Min. 20 mA
ICBO = Max. 6 μA
Also, use transistors with a residual voltage of less than 2 V when the transistor is on.
* The short-circuit impedance should be less than 1 kΩ.
(When the impedance is 0 Ω, the current coming from the start input terminal is approximately 5 mA and from the reset input terminal is approximately 1.5 mA.)
Also, the open-circuit impedance should be more than 100 kΩ.
Input wiring
When wiring, use shielded wires or metallic wire tubes, and keep the wire lengths as short as possible.
2.Output connection
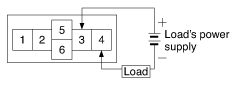
Since the transistor output of hour meter is insulated from the internal circuitry by a photo-coupler, it can be used as an NPN output or PNP (equal value) output.
As NPN output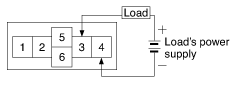
2.Self-diagnosis function
If a malfunction occurs, one of the following displays will appear.
| Display | Contents | Output condition | Restoration procedure | Preset values after restoration |
|---|---|---|---|---|
| Err-00 | Malfunctioning CPU | OFF | Enter front reset key or restart hour meter | Preset value at start-up before the CPU malfunction occurred |
| Err-01 | Malfunctioning memory* | "0" |
*Includes the possibility that the EEP-ROM’s life has expired.
3.Power failure memory
The EEP-ROM is overwriting with the following timing.
| Operation mode | Overwrite timing |
|---|---|
| G (Totalizing ON delay) mode | Change of preset value or when power is OFF after start and reset input turns ON |
| Other modes | When power is OFF after changing preset value |
4.Terminal connection
- 1.When wiring the terminals, refer to the terminal layout and wiring diagrams and be sure to perform the wiring properly without errors.
Tighten the terminal screws with a torque of 0.8 N・cm or less.The screws are M3.5. An external power supply is required in order to run the main unit.
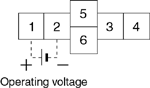
Power should be applied between terminals (1) and (2).
Terminal (1) acts as the positive connection and terminal (2) as the negative.
- 2.After turning the hour meter off, make sure that any resulting induced voltage or residual voltage is not applied to power supply terminals (1) through (2).
(If the power supply wire is wired parallel to the high voltage wire or power wire, an induced voltage may be generated at the power supply terminal.)
- 3.Have the power supply voltage pass through a switch or relay so that it is applied at one time.
Precautions in Using The LH2H Series
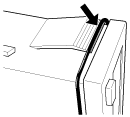
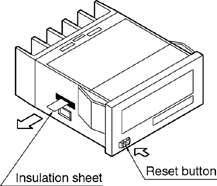
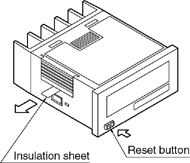
Insulation sheet
Before using a panel mounting type, please pull and remove the insulation sheet in the direction of the arrow.
In consideration that the product might be stored for long periods without being used, an insulation sheet is inserted before shipping.
Remove the insulation sheet and press the front reset button.
Waterproof construction
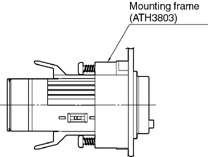
LH2H hour meter (installation frame type)
The operation part of the panel installation type (installation frame type) is constructed to prevent water from entering the unit and a rubber gasket is provided to prevent water from entering the gap between the unit and the panel cutout.
There must be sufficient pressure applied to the rubber gasket to prevent water from entering.
Be sure to use the mounting screws when installing the mounting frame (ATH3803).
Note:The one-touch installation type is not waterproof
LH2H preset hour meter
- 1.When using the waterproof type (IP66: panel front only), install the hour meter to the front plate with mounting frame ATH3803 (sold separately) and rubber gasket ATH3804 (sold separately).
Be sure to tighten using mounting screws.
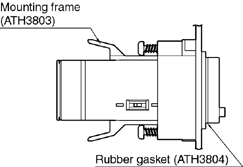
*When installing the mounting frame and rubber gasket please remove the pre-attached o-ring.
- 2.Panel installation order
- 1.Remove o-ring.
- 2.Place rubber gasket.
- 3.Insert hour meter into panel.
- 4.Insert mounting frame from the rear.
- 5.Secure with mounting screws (two locations)
Do not use in the following environments
- 1.In places where the temperature changes drastically.
- 2.In places where humidity is high and there is the possibility of dew
(When dew forms the display may vanish and other display errors may occur.)
Conditions of use
- 1.Do not use on places where there is flammable or corrosive gas, lots of dust, presence of oil, or where the unit might be subject to strong vibrations or shocks.
- 2.Since the cover is made of polycarbonate resin, do not use in places where the unit might come into contact with or be exposed to environments that contain organic solvents such as methyl alcohol, benzene and thinner, or strong alkali substances such as ammonia and caustic soda.
Cautions regarding battery replacement
- 1.Remove wiring before replacing the battery.
You may be electrocuted if you come into contact to a part where high voltage is applied. - 2.Make sure you are not carrying a static electric charge when replacing the battery.
- 3.Battery replacement procedure
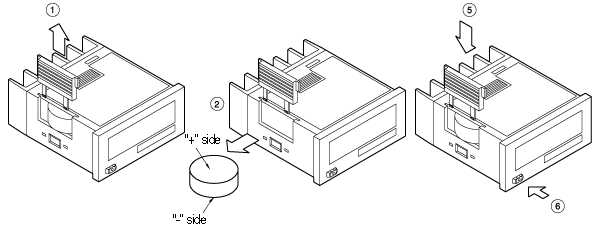
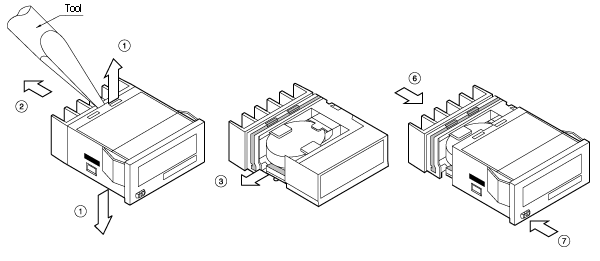
For LH2H hour meter (one-touch installation type)
- 1.Remove the up/down hook of the case using a tool.
- 2.Pull the unit away from the case.
- 3.Remove the battery from the side of the unit. Do not touch the display or other parts.
- 4.Before inserting wipe clean the surface of the new battery.
- 5.Insert the new battery with the "+" and "–" sides in the proper position.
- 6.After replacing the battery, return the unit to the case. Verify that the hook of the case has properly engaged.
- 7.Before using, press the reset button on the front.
For LH2H hour meter
(installation frame type)
- 1.Remove the battery cover from the case.
- 2.2) Remove the battery from the side of the case. The battery will come loose if you put the battery side face down and lightly shake the unit.
- 3.Before inserting wipe clean the surface of the new battery.
- 4.Insert the new battery with the "+" and "–" sides in the proper position.
- 5.After replacing the battery, return the battery cover to the case. Verify that the hook of the battery cover is properly engaged.
- 6.Before using press the reset button on the front.